

No shortcuts. No tech talk. Just clear, detailed steps for anyone trying to build their first website.
Who This Guide Is For
This guide is for you if you’re just starting out and feeling a bit lost.
Maybe you logged into your hosting account, opened cPanel, and expected to see a big button that says “Install WordPress”—but it wasn’t there. Or maybe you’ve heard about WordPress but aren’t sure how to get it onto your website without using one of those one-click tools.
Don’t worry—you’re not alone. Even without that fancy install button, you can still set up WordPress on your site manually. And the best part? You don’t need to be a tech expert.
This guide will walk you through every step like a friendly helping hand—slow, clear, and simple. You’ll know exactly what to click, what to type, and why it matters.
By the end of this guide, you’ll have your own fully working WordPress website—set up by you, with confidence.
🪜 Step 1: Download WordPress
The first thing you need is the WordPress software itself. It’s completely free.
-
Open your browser and go to: https://wordpress.org/download
-
Click the blue “Download WordPress” button.
-
You’ll get a
.zipfile (something likewordpress-6.5.2.zip). Save it to your computer.
This file contains all the core files WordPress needs to run your site.
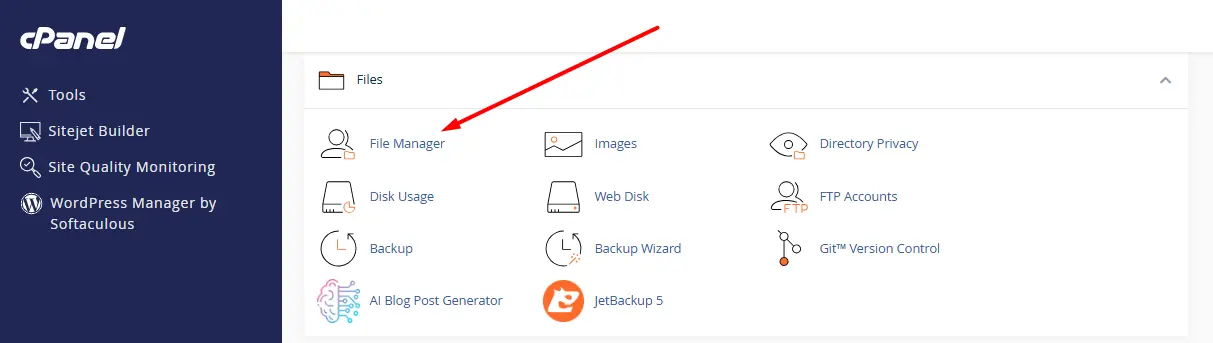
🗂️ Step 2: Log Into cPanel and Go to File Manager
Now, let’s upload that file to your website hosting.
-
Log in to your cPanel. You’ll get the login details from your hosting provider.
-
Look for a tool called File Manager (you’ll see an icon with a folder).
-
Click on it. This opens up all the files and folders on your website server.
📁 Step 3: Upload the WordPress ZIP File
Let’s get WordPress onto your server.
-
In File Manager, open the folder named
public_html.
👉 This is where your website lives. If you’re installing WordPress on your main domain, this is the right place. -
Click the Upload button at the top.
-
On the next screen, select the ZIP file you downloaded earlier.
-
Wait until it finishes uploading. Then go back to
public_html.
🧩 Step 4: Extract the WordPress Files
Once the ZIP file is uploaded:
-
Right-click on the file (or select it and use the “Extract” option from the top menu).
-
Extract it right there in
public_html. -
You’ll now see a folder named
wordpress. Open that folder. -
Select all the files inside it, and click Move.
-
In the path box, type just:
/public_html/— and hit Move Files.
👉 Why do this? If you leave the files in the wordpress folder, your website will only load at yourdomain.com/wordpress. We want it to load at just yourdomain.com, so the files need to live directly inside public_html.
🧠 Step 5: Create a Database for Your Website
WordPress needs a place to store all your website content—like your blog posts, pages, usernames, and settings. That place is called a database.
Let’s create one.
-
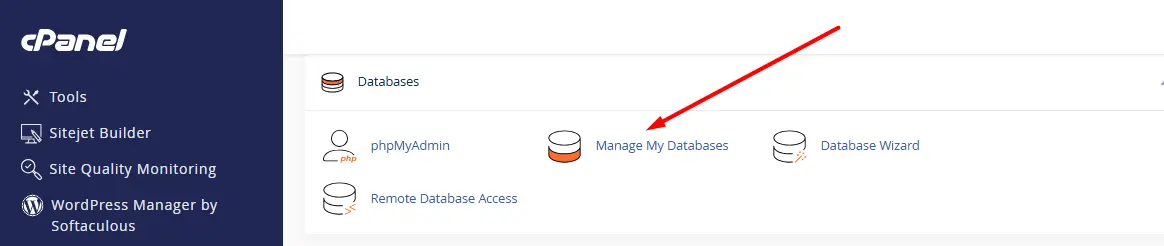
Go back to the main cPanel screen.
-
Look for MySQL® Databases and click on it.
Now follow these steps:
-
Under “Create New Database”, type a name like
mywebsiteand click Create Database. -
Scroll down and under “MySQL Users”, create a new user.
-
Choose a username (e.g.,
wpuser) -
Enter a strong password (or use the password generator)
-
Click Create User
-
-
Scroll down again. Under “Add User to Database”:
-
Select the user and the database you just created.
-
Click Add
-
On the next screen, check the box for “All Privileges”, then click Make Changes.
-
✅ Great! You now have:
-
A database name
-
A username
-
A password
Write these down somewhere—you’ll need them soon.
🌍 Step 6: Start the WordPress Installation
The magic moment is here. You’re about to install WordPress.
-
Open your browser and go to your domain name.
👉 Example:https://yourdomain.com -
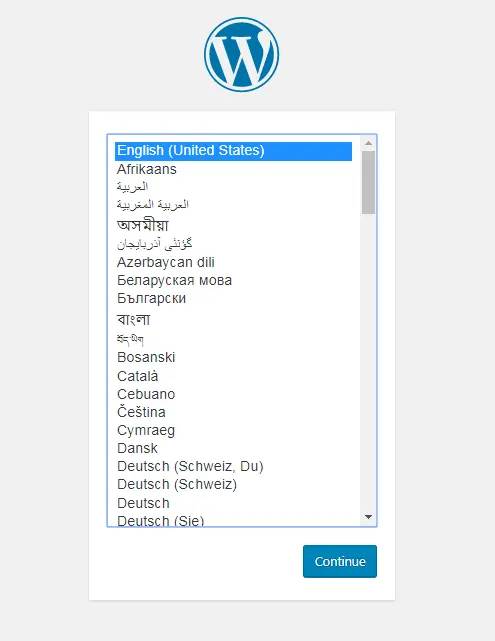
You’ll see the WordPress setup screen. Select your language and click Continue.
On the next screen, WordPress will ask for:
-
Database Name → Enter the database you created
-
Username → The MySQL username you just made
-
Password → The MySQL password
-
Database Host → Just leave it as
localhost -
Table Prefix → You can leave this as
wp_unless you know what you’re doing
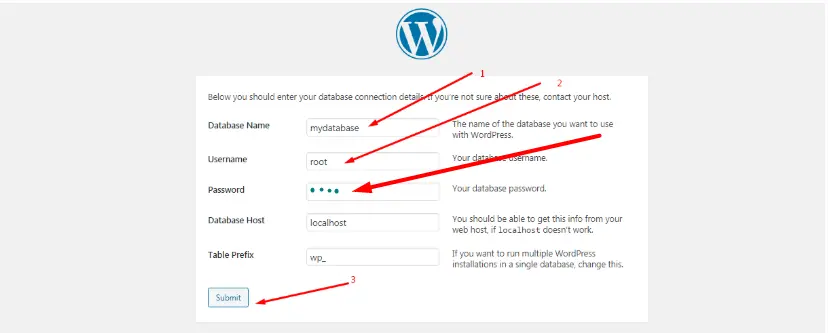
Click Submit, then click Run the installation.
📝 Step 7: Set Up Your WordPress Site
Now WordPress will ask you for some site info:
-
Site Title → This will appear at the top of your website.
-
Username → This is for your WordPress admin login.
-
Password → Choose something secure. You’ll use this to log into your site.
-
Your Email → For admin notifications or password recovery.
Once you fill everything out, click Install WordPress.
That’s it.
You’ll see a success message, and a button to Log In.
🎉 Hurray! You’ve Successfully Installed WordPress
You did it!
You’ve manually installed WordPress on your website—step by step, without shortcuts, without auto-installers. That’s not a small thing. You took full control, followed through, and made it all the way. That means you now know how a website really works behind the scenes—and that knowledge is powerful.
Now what?
Well, now comes the fun part.
👉 Go ahead and log in to your WordPress dashboard at:yourdomain.com/wp-admin
From there, you can:
-
Install a beautiful theme
-
Add a few plugins for extra features
-
Start writing your first blog post or build your first page
Your site is now live and ready to grow. Tell your story. Share your work. Show the world what you’re about.
You’ve built the foundation. Now it’s time to decorate the house. 🏡
🙋♂️ Final Thoughts (From One Beginner to Another)
Installing WordPress manually for the first time can feel a little overwhelming. But once you do it, you realize how much more control and understanding you have over your website.
You now know:
-
Where your files live
-
How your database connects
-
What really happens behind the scenes when a site is installed
This guide was written with you—the true beginner—in mind. Not a single step was skipped, not a single line was left unexplained.